
# Documentation
# How it works
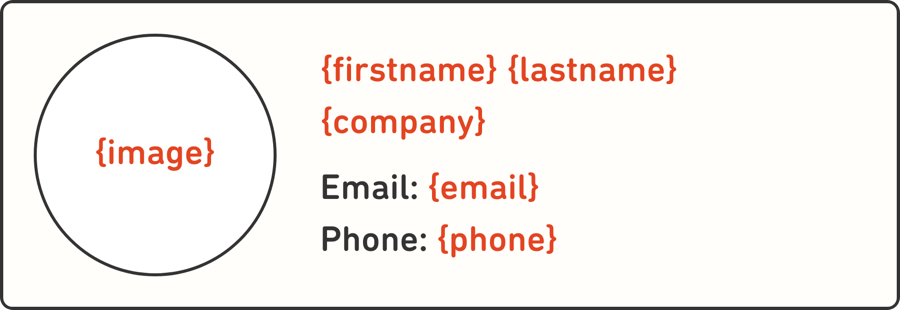
Add {placeholders} to your design mockups – this can be for text or images:
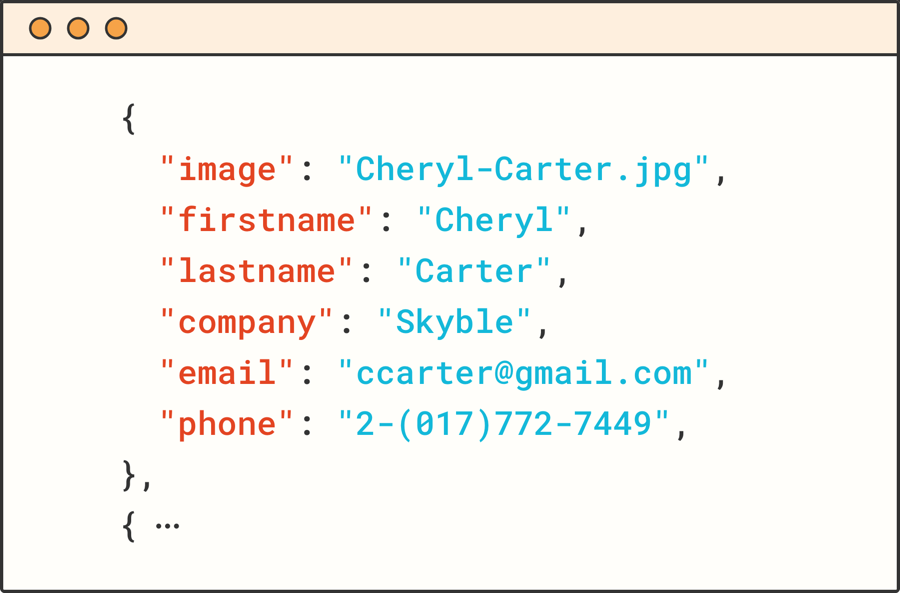
Prepare JSON data with corresponding keys – a local JSON file or your favorite live API:
Populating {placeholders} with data makes your mockups realistic and meaningful:

Please note: Image URLs must be relative to your JSON file, not your Sketch or Adobe XD Document. Also, if your Text Layer is called {name} (in the Layer List), the content of the Layer will always be overwritten with the data contained in {name}. So if you use multiple {placeholders} in a Text Layer, you should rename your Layer to something without curly brackets.
# Plugin Commands
# Populate with Preset
will display a dialog that allows you to select one of your Presets as well as configure Data and Layout options.
# Populate with JSON
will ask you to choose a JSON file that can sit anywhere on your Computer.
# Populate from URL
allows your to populate from a URL to a JSON file in the cloud – or a live API.
# Last Used Data
shows the data configuration that has been last used (and will be used if you use the “Populate again” command).
# Populate again (⌘⇧X)
re-populates all selections with the last used JSON and options configuration. Great for "shuffling" through different data sets to explore the robustness of your design.
# Clear Layers
restores populated Layers to their initial {placeholders}. An example: you used the placeholders {firstname} {lastname} in a Text Layer, they became "John Doe" after populating. "Clear Layers" will restore to {firstname} {lastname}.
This is useful because populating a Text Layer means the initially used {placeholders} will be persisted – so without restoring, it would always try to populate the initial {placeholders}, no matter what you type into the field.
# Reveal Presets
will point you into the plugin's location for its Presets. Presets are simply JSON files and folders with image assets that can live anywhere on your computer.
Reveal Presets is currently only supported in Sketch.
# Set Presets Library
allows you to select the desired location of your Presets.
Set Presets Library is currently only supported in Sketch.
# Data & Layout Options
# Data options
# Randomize data order
instead of going through the JSON top down row by row, it will pick a random data set.
# Trim overflowing text
a Text Layer that has been set with a fixed width will trim overflowing text.
# Insert ellipsis after trimmed text
will insert a "…" after the trimmed text.
# Default substitute (see below)
# Handling missing data
# Text Substitutes
{placeholder}
// → inserts an empty string if no data available for {placeholder}

{placeholder?}
// → uses the Default Substitute if no data available for {placeholder}

{placeholder?substitute}
// → uses the custom substitute appended to '?' if no data available for {placeholder}

{placeholder1??placeholder2}
// → uses the data of 'placeholder2' if no data available for 'placeholder1'
# Image Substitutes
If there's no image available, it will turn off the fill of the placeholder shape and turn it on again once there's data available when repopulating. So for images, it's recommended to put a substitute image or pictogram behind the actual image. So this will be visible if there's no actual image data (see "demo.sketch" for examples).
# Layout options
If "Create grid" is checked, the plugin will create a grid from selected elements (Layer Groups or Artboards) and populate them in one go. Set the amount of rows and columns and the respective margins. This option works very similar to Sketch's "Make Grid" tool (you can use negative margins, too).
Create grid is currently only supported in Sketch.
# Filters
By appending your {placeholder} with one of the following available filters, separated by a |, you can use certain operations on your populated strings. We will add more filters in the future and you can add filters yourself, too.
# Available Filters
# UPPERCASE
You can force your data to be UPPERCASE after populating by appending your {placeholder} with
| upper
{firstname | upper}
// → PETER
// assuming firstname = peter
# lowercase
You can force your data to be lowercase after populating by appending your {placeholder} with
| lower
{firstname | lower}
// → peter
// assuming firstname = PETER
# Capitalize
You can capitalize the first character of your data by appending your {placeholder} with
| capitalize
{firstname | capitalize}
// → Peter
// assuming firstname = peter
# Maximum characters
You can set the maximum number of characters of your {placeholder} by appending it with
| max n ('n' representing the desired number of characters)
{firstname | max 3}
// → Pet
// assuming firstname = Peter
# Join
Imagine you want to concatenate {mail}, {phone} and {twitter} seperated by a · (middle dot).
Usually, you would create a string in a text area like this:
{email} · {phone} · {twitter}
This works great as long as you have data for each key:
johndoe@me.com · +49 170 897 654 · @johndoe
But now imagine there's no data (or substitute) for {phone}. Which would lead to:
johndoe@me.com · · @johndoe
This is where the Join filter comes into play. Use the following syntax to be used inside a {placeholder}:
{email,phone,twitter|& · }

// 1. a comma separated list of keys
// 2. |
// 3. & followed by a delimiter, eg. · or , (put spaces where you need them!)
So in our above mentioned example, without data (or substitutes) for {phone}, it renders like this:
johndoe@me.com · @johndoe
# Date
Especially when working with an API, timestamps might be returned in UNIX or UTC format. The 'date' filter allows you to render timestamps in practically any display format you can imagine (or that is supported by the moment.js library).
{timestamp | date <de> D.M.YY, hh:mm}
// → 14.3.21, 08:44
// assuming timestamp = 2021-03-14T19:44:24Z
The 'date' filter is based on moment.js (opens new window), which means you can basically use all formats (opens new window) the library supports. The Filter also supports all Locales provided by the library.
# Numeral
With 'numeral', you can pimp the display of any given number in your data to something more legible or shorter. Using locales adds another level of flexibility, as there are plenty of flavors for numeral display for different locales. Locales must be defined with brackets, like <de>.
{number | numeral <de> 0,0.00}
// → 100.000,00
// assuming number = 100000
The 'numeral' filter is based on numeral.js (opens new window), which means you can basically use ll formats (opens new window) the library supports. The Filter also supports all Locales provided by the library. Locales must be defined with brackets, like <de>.
# Unit
The 'unit' filter lets you add a unit to your data. This comes in very handy if you work with data substitutes: without a filter, an added unit would always be shown on top of the data substitute. When using the filter, the unit becomes part of the data and in case the substitute hits, the unit will also not be shown.
{number | unit  cm}
// → 2268 cm
// assuming number = 2268
Please note: if you want a space between your number and unit, add it before the unit inside the filter, e.g. cm.
# Convert
Use 'convert' to multiply numbers. It works for all base 10 (e.g metric system) numbers. It's very helpful in combination with the 'unit filter' (see below).
{number | convert 0.01}
// → 23
// assuming number = 2268
# Combining Filters
Filters can be combined or grouped with parentheses within {placeholders}. Here are some examples:
{number | convert 0.01 | unit  m}
// → 23 m
// assuming number = 2268

{firstname | upper | max 3}
// PET
// assuming firstname = Peter

{(lastname, firstname | &, ), DateOfBirth | & born on }
// → Miller, Peter born on 14.07.1970
// assuming firstname = Peter, lastname = Miller

{(firstname | upper | max 3), (lastname | max 1) | & · }
// → PET · M
// assuming firstname = Peter, lastname = Miller
# Conditional Actions
A data-driven "if this than that" for Data Populator: triggers in the data lead to actions in Sketch. A Conditional Action performs a certain action on a Layer Group or Symbol based on data and a conditional expression.
The Conditional Action is controlled by the name of a Layer Group (or Symbol Instance).
# Available Actions
1. #show[condition]
// → shows layer if true and hides otherwise

2. #hide[condition]
// → hides layer if true and shows otherwise

3. #lock[condition]
// → locks layer if true and unlocks otherwise

4. #unlock[condition]
// → unlocks layer if true and locks otherwise

5. #delete[condition]
// → deletes the layer if the condition is true

6. #plugin[condition, command path]
// → runs the specified plugin command if condition is true
// Command path: 'Plugin > Command'

7. #swapSymbol[condition, symbol name]
// → swaps the affected symbol to the via *symbol name* specified symbol
# Examples
#show["{firstname}".length > 3]
// shows layer if {firstname} has more than 3 characters and hides otherwise

#show["{firstname}" == "Peter"]
// shows layer if {firstname} is 'Peter' and hides otherwise

#show["{firstname}".includes('e')]
// shows layer if {firstname} includes 'e' and hides otherwise

#show["{firstname}".startsWith('Pe')]
// shows layer if {firstname} starts with 'Pe' and hides otherwise

#show["{firstname}".endsWith('r')]
// shows layer if {firstname} ends with 'r' and hides otherwise

#swapSymbol[true, bg/{color}]
// swaps the affected symbol to 'bg/red' (assuming {color} delivers 'red' from the data).
'true' can be replaced with any conditional expression.
# Combining Actions
# Multiple Conditions:
#show["{firstname}".includes('e') || "{firstname}".length > 3]
// shows layer if {firstname} includes 'e' and has more than 3 characters, hides otherwise
# Multiple Actions:
#swapSymbol["{status}" == "regular", bg/white] #swapSymbol["{status}" == "VIP", bg/yellow]
Pure JavaScript syntax is being used for Conditional Actions, so you can basically use anything available in JavaScript.
Conditional Actions are currently only supported in Sketch.
# Multiline Text Layers
Usually, populating Text Layers is limited to single lines of text. If you populate Point Type, it will always expand the width of the Layer and keep it single line.
If you populate a Text Area without the trimming (see above), it will keep that fixed width but always expand the number of lines to fit the available data. If you populate it with trimming turned on, it will always truncate the data to a single line – meaning the default max. number of lines is 1.
However, if you want Data Populator to truncate after another defined number of lines, that's also possible. Do this by appending the following to the Layer Name:
| -l n
// n = desired number of max. lines
Multiline Text Truncation currently only works in Sketch.
# Populating Iconfonts
If you're into using Iconfonts for Icons in Sketch as described in this article (opens new window), that's a great fit with Data Populator. It is possible because Iconfonts use custom ligatures to trigger certain icons: for example, the string 'heart' is being replaced with a ♥ icon.
To make this happen, simply create a Point Type Layer, choose an appropriate Iconfont and call the Layer {iconname} (according to your available Ligatures) in the Layer List.
The Layer's content will always be replaced with the {iconname} representing a ligature, triggering the respective icon.